Apple Pay (Web)
Apple Pay lets a customer check out with a single touch using a card already saved in their Apple Wallet, instead of typing card details. This guide covers Apple Pay on the Web (Safari); native iOS/macOS app integrations use a different flow (PKPaymentAuthorizationController) and aren't covered here.
Apple retrieves the card details securely and hands your site an encrypted payment token, so your systems are never exposed to raw card data for that transaction.
Important; Fat Zebra's Hosted Payment Page has an applepay URL parameter, but their own team confirmed this path isn't ready to rely on yet: their SDK support for showing wallet buttons inside the hosted page is still incomplete. Use the standalone integration in this guide instead.
Before Starting
- Activate Apple Pay (web) in the ArtsPay Merchant Dashboard and register your domain (see Step 1 below). Unlike Google Pay, nothing here works until this is done. Requires an Admin (or above) account role.
- All pages showing the Apple Pay button must be served over HTTPS, on a domain you've verified with Apple. This applies in sandbox too: Apple has no separate "test domain" exemption, so plain
http://localhostwon't work. - An Apple Developer account, needed to register your Merchant ID.
- Your site must meet Apple's Acceptable Use Guidelines for Websites.
- For testing, set up an Apple Sandbox Tester account and add a sandbox test card to a real device's Wallet. There's no way to trigger the payment sheet without genuine Safari and Wallet support, unlike Google Pay's browser-only test flow.
Domain verification and certificates are issued by Apple and have their own lead times, so start Step 1 well before your go-live date, not the week before.
Download example code, grab one of our pre-built hosted payment pages in HTML, React, Vue or Next.js, with Node.js, Python, PHP or Ruby as thier back-ends, select below or explore the ArtsPay Github.
Step 1: Activate Apple Pay (web) and register your domain
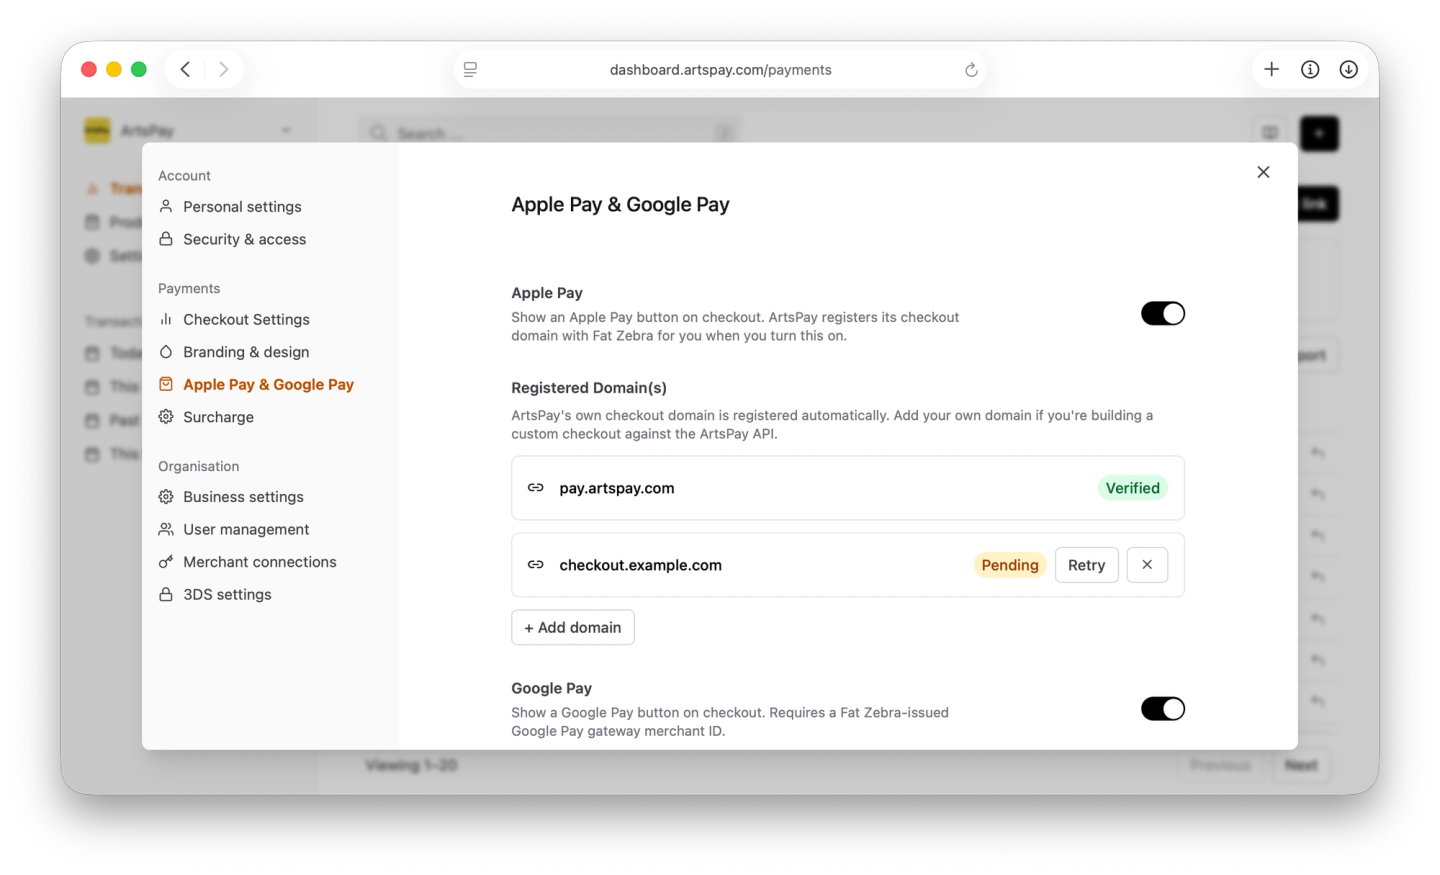
- In the Merchant Dashboard, go to Settings → Apple Pay & Google Pay (visible to Admin and above) and turn on Apple Pay. This automatically registers ArtsPay's own checkout domain with Fat Zebra, that part only matters if you're also using ArtsPay Payment Links, not for the custom integration in this guide.
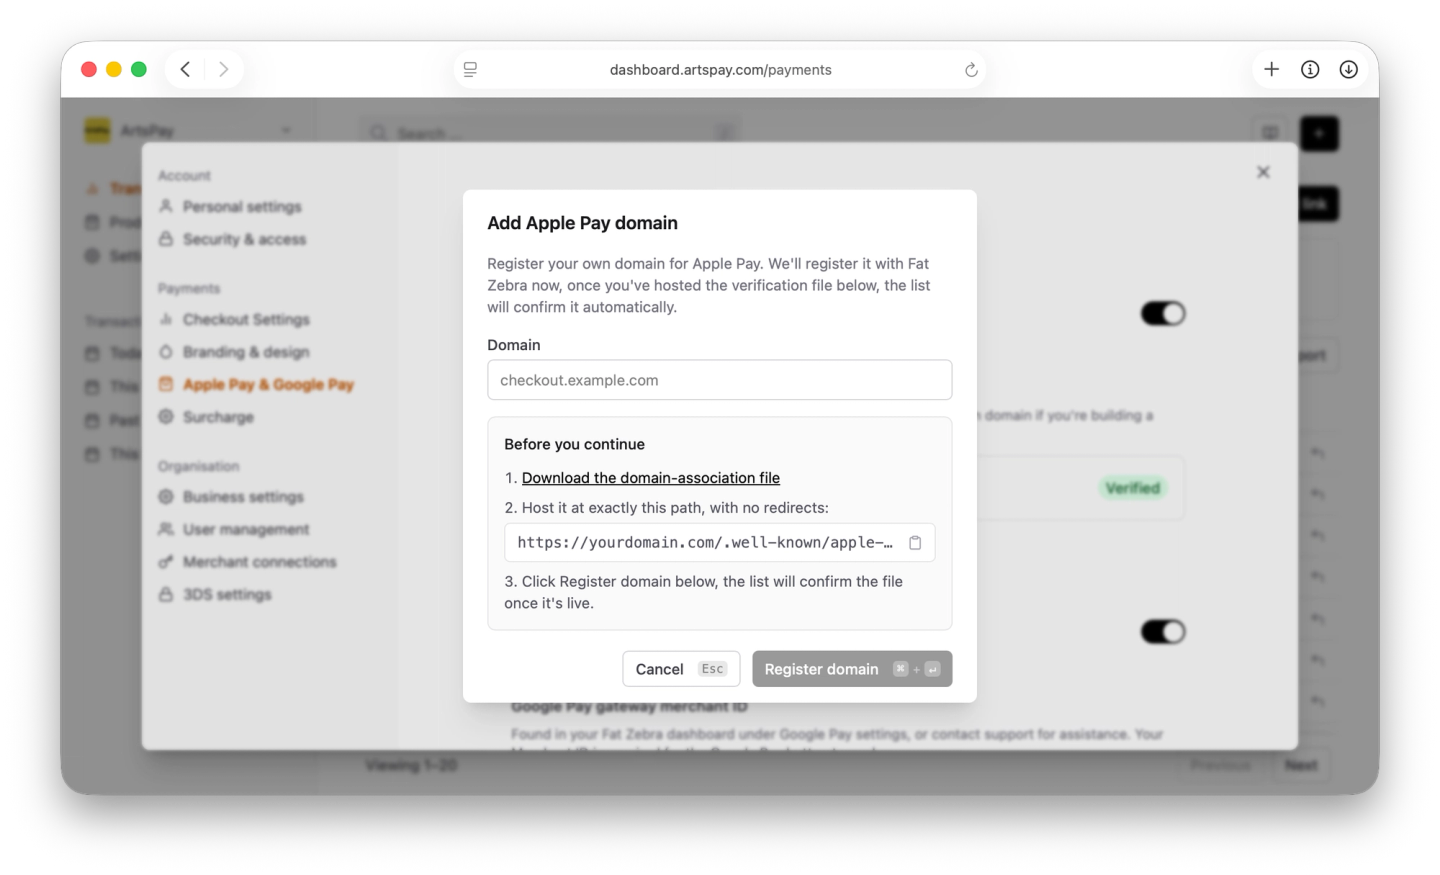
- Click + Add domain and enter the domain your Apple Pay button will actually run on
- Download the domain-association file from the dialog and host it at exactly
https://yourdomain.com/.well-known/apple-developer-merchantid-domain-association, served as-is, with no redirect and no file extension - Click Register domain. Fat Zebra accepts the registration immediately, but the domain shows as Pending until ArtsPay has independently confirmed the file is hosted correctly, this is checked automatically every few seconds for a couple of minutes, or click Recheck to force an immediate check. Once confirmed, it flips to Verified
- Add further domains the same way from the same screen
Domain registration can also be managed programmatically via the Digital Wallet Registration API if you need to automate onboarding across many merchant subdomains.
This dashboard flow replaces the older manual process of generating a Merchant Identity Certificate CSR and uploading it to the Apple Developer Dashboard yourself; ArtsPay now handles certificate issuance for you.
Step 2: Add the Apple Pay button
Check availability and render Apple's button:
if (window.ApplePaySession && ApplePaySession.canMakePayments()) { document.getElementById('apple-pay-button').hidden = false}Style the button using Apple's official button CSS rather than a custom image. This is a requirement of Apple's guidelines.
Step 3: Create a session and validate the merchant
const request = { countryCode: 'AU', currencyCode: 'AUD', supportedNetworks: ['visa', 'masterCard', 'amex'], merchantCapabilities: ['supports3DS'], total: { label: 'ArtsPay Merchant', amount: '10.25' },}const session = new ApplePaySession(3, request)session.onvalidatemerchant = async (event) => { const res = await fetch('/api/apple-pay/session', { method: 'POST', body: JSON.stringify({ validationURL: event.validationURL }), }) const merchantSession = await res.json() session.completeMerchantValidation(merchantSession)}Your backend calls ArtsPay's Get Apple Pay Session endpoint with that validation URL:
curl "https://paynow.pmnts-sandbox.io/v2/apple_pay/payment_session?url=<validationURL>&domain_name=yourdomain.com&display_name=Your Store" \ -u YOUR_USERNAME:YOUR_TOKENThis returns an opaque session object. Pass it straight back to the browser and into completeMerchantValidation.
Note: The url value must come from Apple's whitelisted domains, or the endpoint returns 400 Bad Request.
Step 4: Handle authorization and charge the card
session.onpaymentauthorized = async (event) => { const res = await fetch('/api/apple-pay/charge', { method: 'POST', body: JSON.stringify({ token: event.payment.token, amount: '10.25', reference: 'order_123' }), }) const result = await res.json() session.completePayment(result.successful ? ApplePaySession.STATUS_SUCCESS : ApplePaySession.STATUS_FAILURE)}Your backend then calls Create a purchase using a wallet, passing the Apple Pay token through as-is:
{ "amount": 1025, "currency": "AUD", "reference": "order_123", "wallet": { "type": "APPLEPAYWEB", "token": { "paymentData": { "...": "as provided by Apple" }, "paymentMethod": { "...": "as provided by Apple" } } }}For transactions routed over EFTPOS, token.paymentMethod.network must be "eftpos" (case-insensitive); the response will include metadata.least_cost_routed: "true" when this happens.
Testing
In the ArtsPay sandbox, Apple Pay responses are cent-based: a $1.00 request returns response code 00 (approved), a $1.05 request returns 05 (declined), so you can drive any outcome by choosing the amount.
FAQ
Do I need to onboard separately for the app and the web?
Apple Pay (app) and Apple Pay (web) are activated and configured separately in Settings → Payment Methods, even though they share the same underlying Merchant ID.
Do I still need to manually generate CSRs and upload certificates to Apple?
No. Onboarding via the Merchant Dashboard generates the certificate signing request for you and handles the certificate exchange. The manual CSR process still exists as a fallback but isn't the recommended path.
Why does my domain show as "Pending" instead of "Verified"?
Fat Zebra accepts a domain registration immediately regardless of whether the association file is actually hosted yet, so a new domain always starts as Pending. ArtsPay separately and repeatedly checks the file itself, byte-for-byte, against Fat Zebra's reference file for your environment — once that check passes, the domain flips to Verified automatically. If it stays Pending, double-check the file is hosted at exactly the path shown in the Add Domain dialog, served directly with no redirect, then click Recheck.
Should I use the Apple Pay JS API or the W3C Payment Request API?
Either works with ArtsPay. Apple Pay JS API (ApplePaySession, shown above) is the more common and simpler choice; the W3C Payment Request API is a cross-wallet standard if you're also supporting other payment request APIs on the same checkout.
Can I test without real cards?
Yes. The ArtsPay sandbox accepts Apple's sandbox test cards and returns cent-based response codes, so you can trigger any decline scenario deterministically.
Does Apple Pay support recurring payments?
Yes, using the card_token returned from the first Apple Pay transaction, but acquirer support for recurring Apple Pay transactions varies, so check with your acquirer before relying on it.